


Designed with vibrant colors and intricate designs, sugar skulls are one of the most important elements of Mexico’s Day of the Dead (Día de Los Muertos) celebration. These cranium-shaped objects were originally made with sugar (hence the name), but nowadays sugar skulls are created in all shapes in sizes and dressed with brightly-colored paints, glittery sequins, metallics, or other fun and festive decorative details!
With Día de Los Muertos coming up on November 1st, I thought I would share fun DIY sugar skull craft ideas for the family to work on together. Not only are these sugar skulls an excellent way to experiment with color, but it's also a great way to introduce kids to the rich culture and traditions of Día de los Muertos.
Supplies Needed
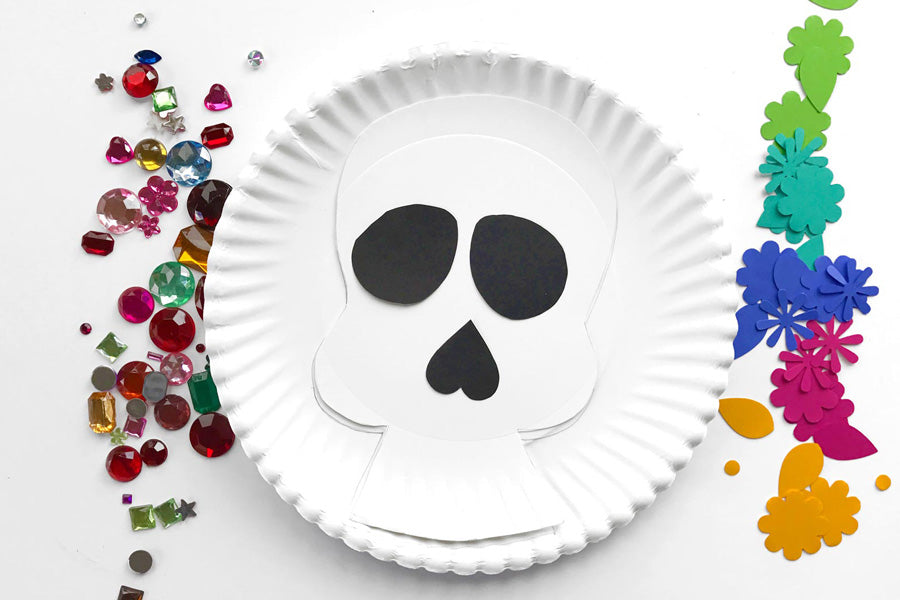
Step 3: Draw some teeth. This was surpassingly easy for the kids. I had them draw 6 small ovals with a line through each one at the bottom of the plate
Step 4: Decorate the skull! From gems to colorful markers, decorative papers and any other festive embellishments, sugar skulls can never have too many decorations!
Here are the finished skulls from my son’s classroom. The children were so proud of their work and kept showing each other all of the details and embellishments they added.

 Supplies Needed
 Directions
Step 1: Outline your design onto the wooden spoon very lightly in pencil
Step 2: Using your perfectly permanent double ended markers, draw the details of your design first
Step 3: Fill in the background of your design
Step 4: Decorate the handle of your spoon
For a unique and festive gift, put a few of your decorated sugar skull spoons into a mason jar, along with small candies and treats
Directions
Step 1: Wrap each of toilet paper roll in a colorful piece of origami or constructions paper. It’s easiest to use scotch tape to adhere the paper
Step 2: Using a pencil, sketch a sugar skull design
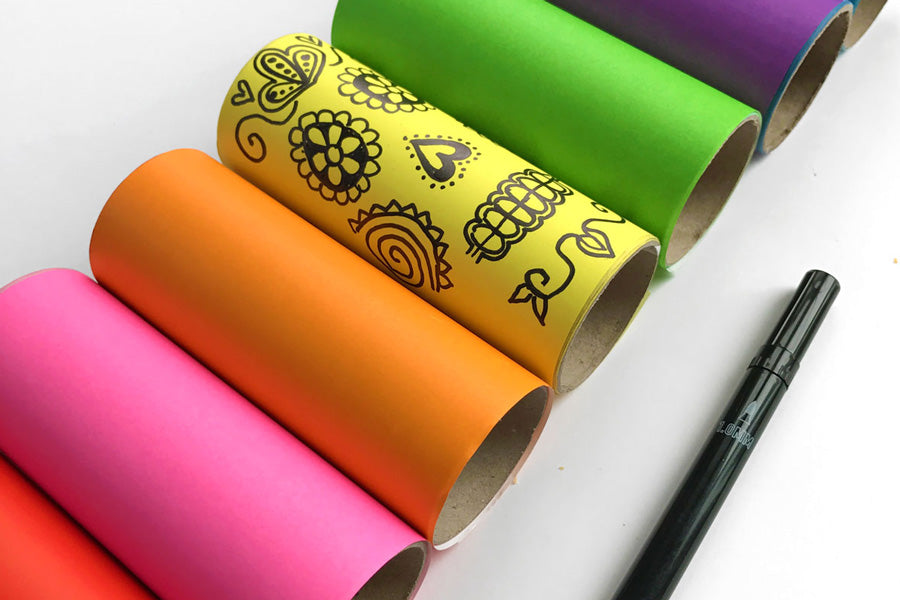 Step 3: With a fine-tip marker, trace over your pencil sketch and add more details as desired.
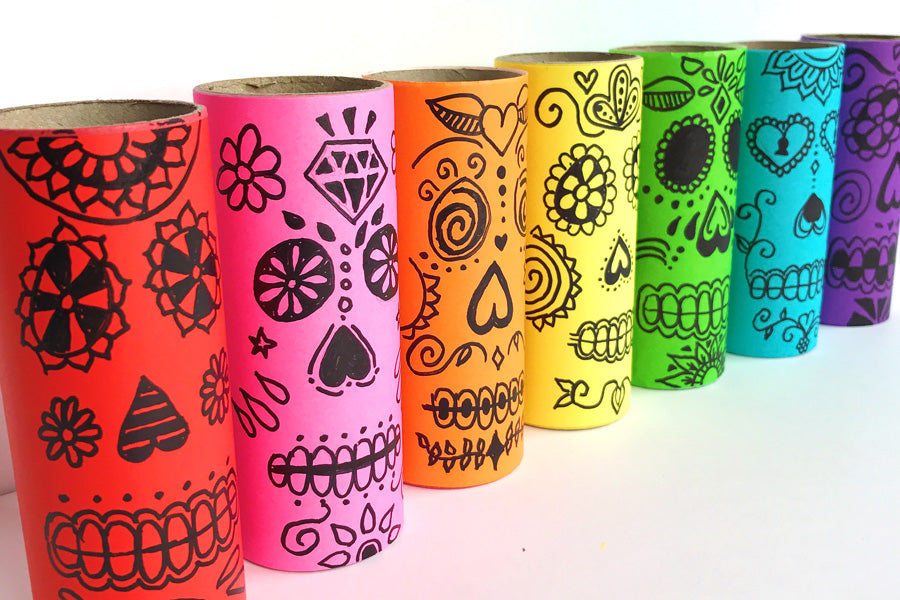 Now that you have your finished skulls, use them for decoration or gifts. If you add a hole punch to the top of each roll on both sides, you can string them together to create beautiful Day of the Dead garland. Or you can add a circle card stock cutout to each end, fasten with tape, and stuff the rolls with mini-candies.
 Directions
Step 1: Outline your design on the rock in pencil - I usually do this before I start painting
Step 2: Add acrylic paint to the completed design. It’s easiest to add the background first, so start with the outline of your skull design and fill it in.
Step 3: Add the eyes, nose, and mouth
Step 4: Decorate with lots of colorful details and designs
Step 5: Using a foam brush, seal your rock with one thin layer of Mod Podge
And vuela, you've just created a special gift or a little keepsake!
Directions
Step 1: Outline your design on the rock in pencil - I usually do this before I start painting
Step 2: Add acrylic paint to the completed design. It’s easiest to add the background first, so start with the outline of your skull design and fill it in.
Step 3: Add the eyes, nose, and mouth
Step 4: Decorate with lots of colorful details and designs
Step 5: Using a foam brush, seal your rock with one thin layer of Mod Podge
And vuela, you've just created a special gift or a little keepsake!

For more colorful ideas and DIYs, be sure to follow me and OOLY on Instagram.
Craft Idea #1 | Paper Plate Sugar Skull Masks
The idea for paper plate sugar skulls came about while brainstorming craft ideas to do with my son’s kindergarten class. I needed an activity that was not only fun and colorful, but also manageable to do with twenty-five children. This activity proved to be a HUGE success. Enjoy!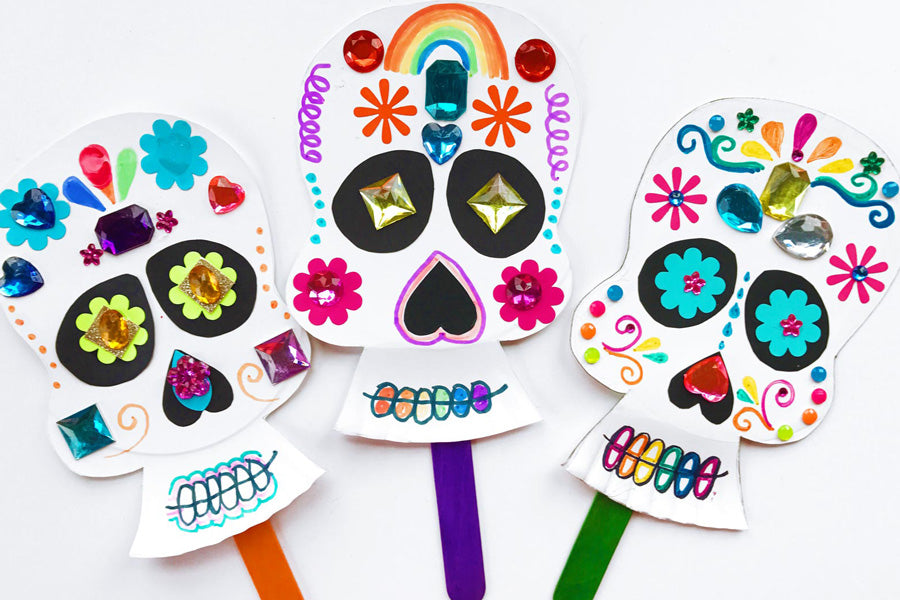
- Paper Plates
- Colorful Markers + Black Ink Markers
- Colorful Acrylic Gems and/or Sticker Gems
- Card Stock or Construction Paper - both colored or Black Paper work great
- Glue Stick / Glue
- Scissors
- Decorative Paper Hole Punch - I used this one to create decorative flowers (Optional)
- Jumbo Colored Craft Sticks - Only if you want to turn your skull into a mask (Optional)
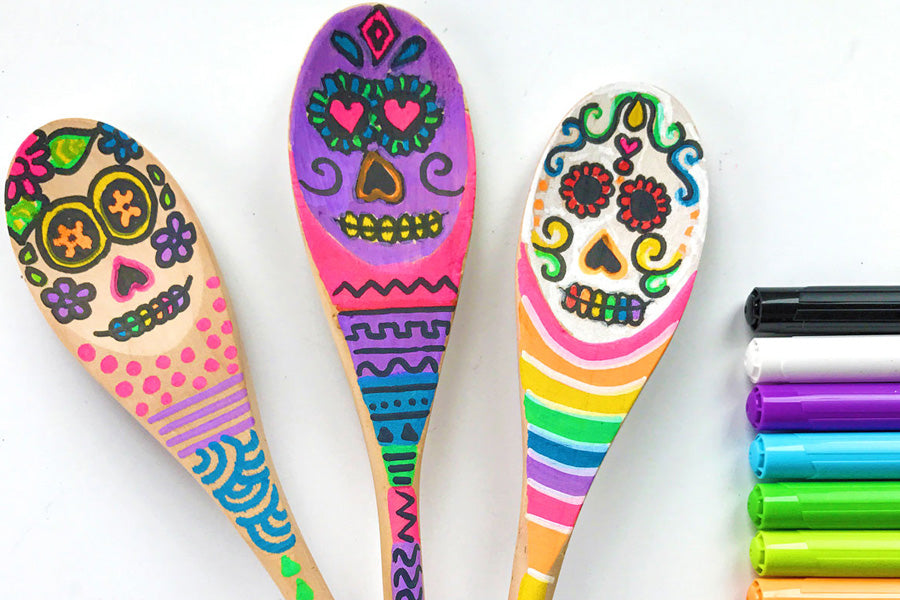
Craft Idea #2 | Wooden Spoon Sugar Skulls
Supplies Needed
- Wooden Spoons - you can find these at most craft stores in the wood section
- perfectly permanent double ended markers - I love that these markers can draw on a variety of surfaces, including wood!
Directions
Step 1: Outline your design onto the wooden spoon very lightly in pencil
Step 2: Using your perfectly permanent double ended markers, draw the details of your design first
Step 3: Fill in the background of your design
Step 4: Decorate the handle of your spoon
For a unique and festive gift, put a few of your decorated sugar skull spoons into a mason jar, along with small candies and treats
Craft Idea #3 | Toilet Paper Roll Sugar Skulls
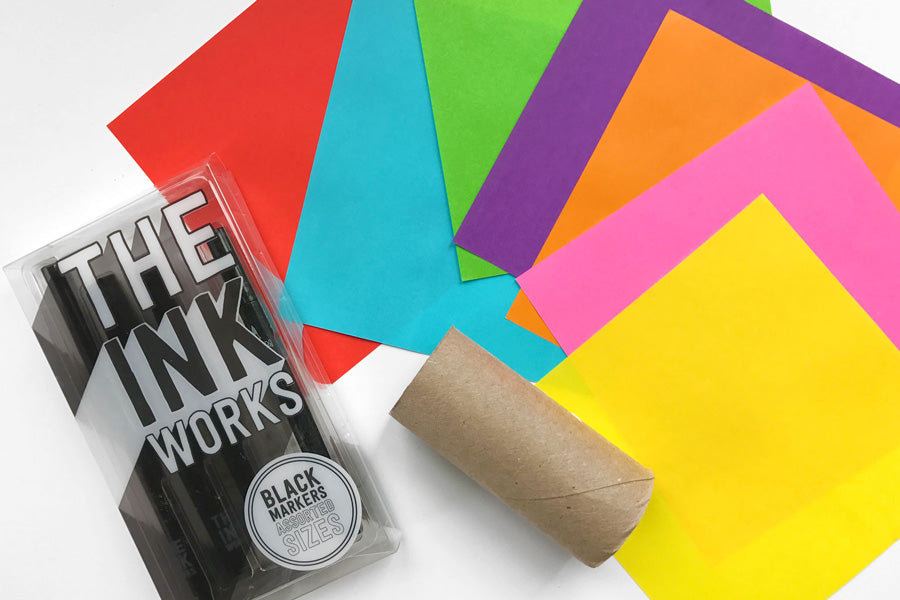
Supplies Needed- Toilet Paper Rolls
- Black markers - I used OOLY's ink works markers
- Origami Paper or Construction Paper
- Scotch Tape
- Candy! (Optional as a filler)
 Step 3: With a fine-tip marker, trace over your pencil sketch and add more details as desired.
Now that you have your finished skulls, use them for decoration or gifts. If you add a hole punch to the top of each roll on both sides, you can string them together to create beautiful Day of the Dead garland. Or you can add a circle card stock cutout to each end, fasten with tape, and stuff the rolls with mini-candies.
Step 3: With a fine-tip marker, trace over your pencil sketch and add more details as desired.
Now that you have your finished skulls, use them for decoration or gifts. If you add a hole punch to the top of each roll on both sides, you can string them together to create beautiful Day of the Dead garland. Or you can add a circle card stock cutout to each end, fasten with tape, and stuff the rolls with mini-candies.
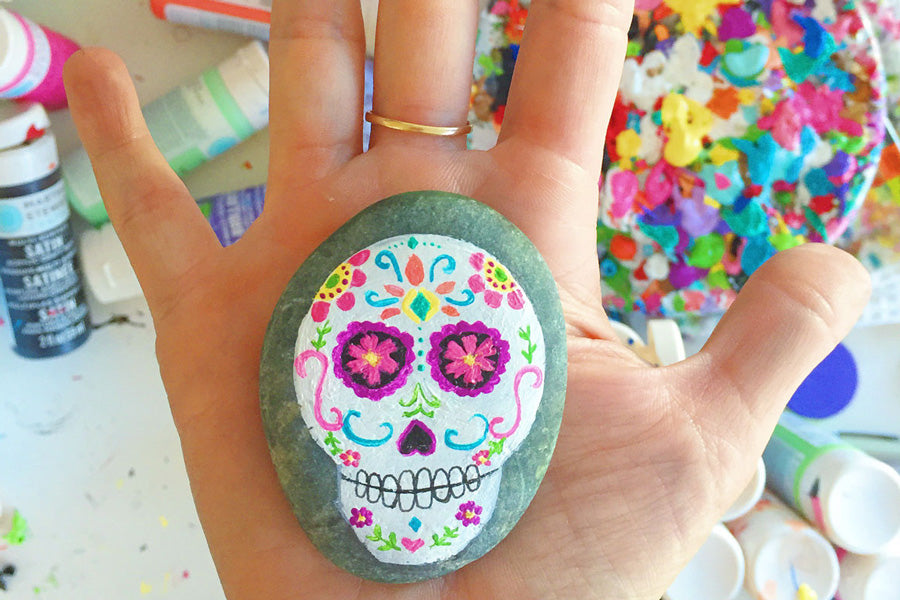
Craft Idea #4 | Painted Rock Sugar Skulls
Supplies Needed- Acrylic paint - my favorite is the Martha Stewart Living acrylic paint
- Smooths stones - If you can’t find you can also use a wood slice, which you can find at a craft store
- A small paintbrush for adding details
- Mod Podge and a foam brush (Optional sealant)
Directions
Step 1: Outline your design on the rock in pencil - I usually do this before I start painting
Step 2: Add acrylic paint to the completed design. It’s easiest to add the background first, so start with the outline of your skull design and fill it in.
Step 3: Add the eyes, nose, and mouth
Step 4: Decorate with lots of colorful details and designs
Step 5: Using a foam brush, seal your rock with one thin layer of Mod Podge
And vuela, you've just created a special gift or a little keepsake!

Craft Idea #5 | Sugar Skull Coloring Page
If you don’t have time for a full craft, but you do want to celebrate Day of the Dead (Día de los Muertos), you can download these free printable coloring pages:
Art credit: mskoslowsartroom
For more colorful ideas and DIYs, be sure to follow me and OOLY on Instagram.


