


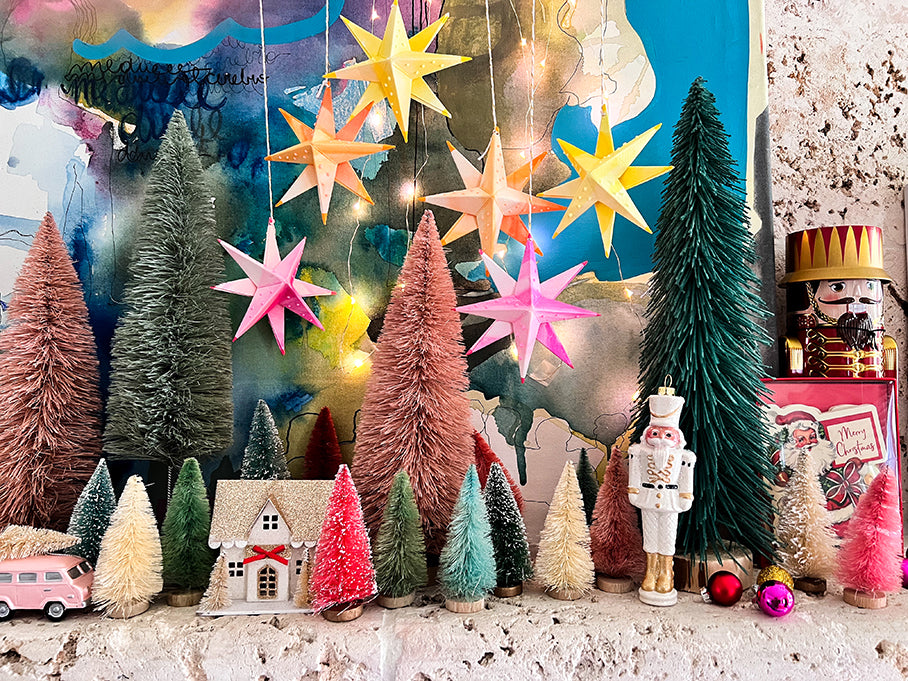
I love decorating for the holidays, it’s my favorite time of the year!! I always like to craft one or two DIY holiday decorations with my kids. These 3D paper stars are one of the most perfect holiday crafts to make together to really make the season twinkle!! It’s easy to create these stars in all different colors and sizes. Decorate shelves, mantles or buffet tops with them, or add string to hang them from your ceiling and create a galaxy of wonder. Whatever you choose, they are guaranteed to create some holiday cheer!
Time Duration: 15 minutes
Skill Level: Intermediate
OOLY Products Needed:

- Magic Puffy Pens
- Stampables Double-Ended Stamp Markers
- Lil' Watercolor Paint Pods
- Chroma Blends Watercolor Paper
Other Items Needed:
- Scissors (adult supervision required)
- Glue
- Hole Puncher
- Bakers Twine (we used gold and white)
- Blow Dryer (for Magic Puffy Pens)
Directions:
Step 1: Gather all of your craft supplies!


Step 2: Grab a sheet of watercolor paper from your Chroma Blends Watercolor Paper pad and cut it into 4 squares. Each square should measure 4 x 4 inches. Fold each square in half horizontally and vertically - then fold them from corner to corner. You should have an asterisk shape.

Step 3: Paint your squares with Lil' Watercolor Paint Pods. I made my stars in different shades of orange, pink and yellow, using all the hues of those colors that the Lil' Watercolor Paint Pods have. Get creative and have fun with it- rainbow stars are also so pretty!

Step 4: Using your Stampables Double-Ended Stamp Markers, color the corners of your squares. I love these markers because the tip is soft and the ink just flows, not to mention they smell delicious!! *If you are feeling adventurous, you can also stamp the paper to add extra fun!

Step 5: Turn the paper over and make 4 cuts where the vertical and horizontal folds are.


Step 6: Fold the paper forming a triangle. Repeat for all 4 sides.


Step 7: Put glue on one side of the triangle first, then on all four sides.

It should look like this. You’ll need 2 parts to make one full star.

Step 8: Make little dots on the star using your OOY Magic Puffy Pens. I used orange on orange, pink on pink and yellow on yellow. But confetti style is always fun!

Step 9: Using your blow dryer, give those dots some heat. You’ll see the paint POP!

Step 10: Glue one side of the star to the other. The best way to do this is to put the stars together and carefully sneak the glue underneath where the stars touch.


Step 11: Using your hole puncher, make a hole in one of the star’s points. Thread the baker’s twine through the hole and get ready to hang!

These stars make such a beautiful impact and make perfect easy DIY holiday decorations. But if you’re really feeling the starlight vibes, reuse them as unique birthday decorations, or keep them up all year as an added pop of playfulness for a kids room or playroom.
We would love to see photos of your craft projects! Tag us on Instagram at @WeAreOOLY using #OOLYcreateyourhappy.


